I recently found myself on a large, multi-schema/multi-database project that was being moved over to Prisma. What I ended up finding along the way is that in order to use Prisma I would need a separate Prisma Client for every database and every schema we intended to use.
This seemed like a PAIN at first because every time we needed a new client we would have to manually go in and initiate a new Prisma setup, generate the project, and all the while try to do it in a standard way.
For obvious reasons, that wasn't gunna fly...
Our Solution
Nx offers a super flexible and awesome tool that allows us to create our own generators. These generators can take in some input and generate files and code for you.
What I ended up deciding on to solve our problem was building a custom Nx generator to scaffold out the new prisma setups for us!
If you aren't familiar with Nx, check it out!
Below I'll walk you through how we set that up and how you might implement it in your own Nx monorepo. Let's get started, shall we?
Prerequisites
Before we can get started, let's make sure we have some things installed and set up.
First off, you'll need the following installed on your machine if you don't have them already:
- Node
- Nx
- Nx Console Editor Extension(optional)
You'll also want to have set up a project using Nx. In this tutorial we'll be working off of an empty project, essentially the most basic setup. You can use whichever preset you'd like though.
For information on how to do that, Nx's amazing docs can walk you through a basic setup.
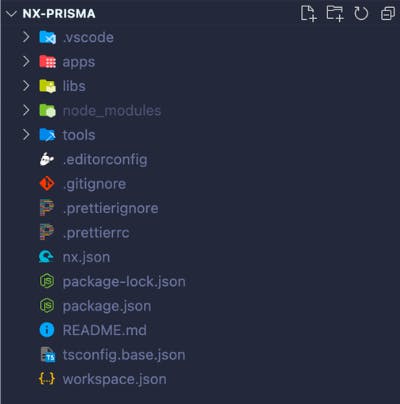
Once you have things all set up, you should have an empty project that looks something like this:
The Goal
What we want to do is create a generator that will build out the directories and files required for a Prisma setup along with some generated code that sets up our exports and schema.
To do this, we're going to create a base template of a Prisma project and copy that template over when the generator is run. In our generator, through the tools Nx provides, we will hydrate (populate) the files with meaningful names and variable content and copy those files to their correct locations.
In the end, we should be able to generate a folder into a localized library named prisma-clients that will provide our Prisma Clients.
We will be able to access the Prisma Client using something like:
import { DbOneClient, DbTwoClient } from '@nx-prisma/prisma-clients'

// Or individually, so we can pull out generated types
import { DbTwoClient, SomeType } from '@nx-prisma/prisma-clients/db-two'

const Client1 = new DbOneClient()
const Client2 = new DbTwoClient()
With that in mind, let's get to some coding!
Creating a Custom Generator
Nx has a wide arrange of generators available to help scaffold out your projects, but also has a feature called workpace-generators. These are generators that we can easily build into our projects to automate tasks that are repetitive or tedious (like setting up a new prisma project...).
To set one up, Nx provides this command that will create the base files we'll need:
nx generate @nrwl/workspace:workspace-generator prisma-generator
This will spit some files out in the tools/generators folder inside of a folder named whatever name you provided the command (in our case prisma-generator)

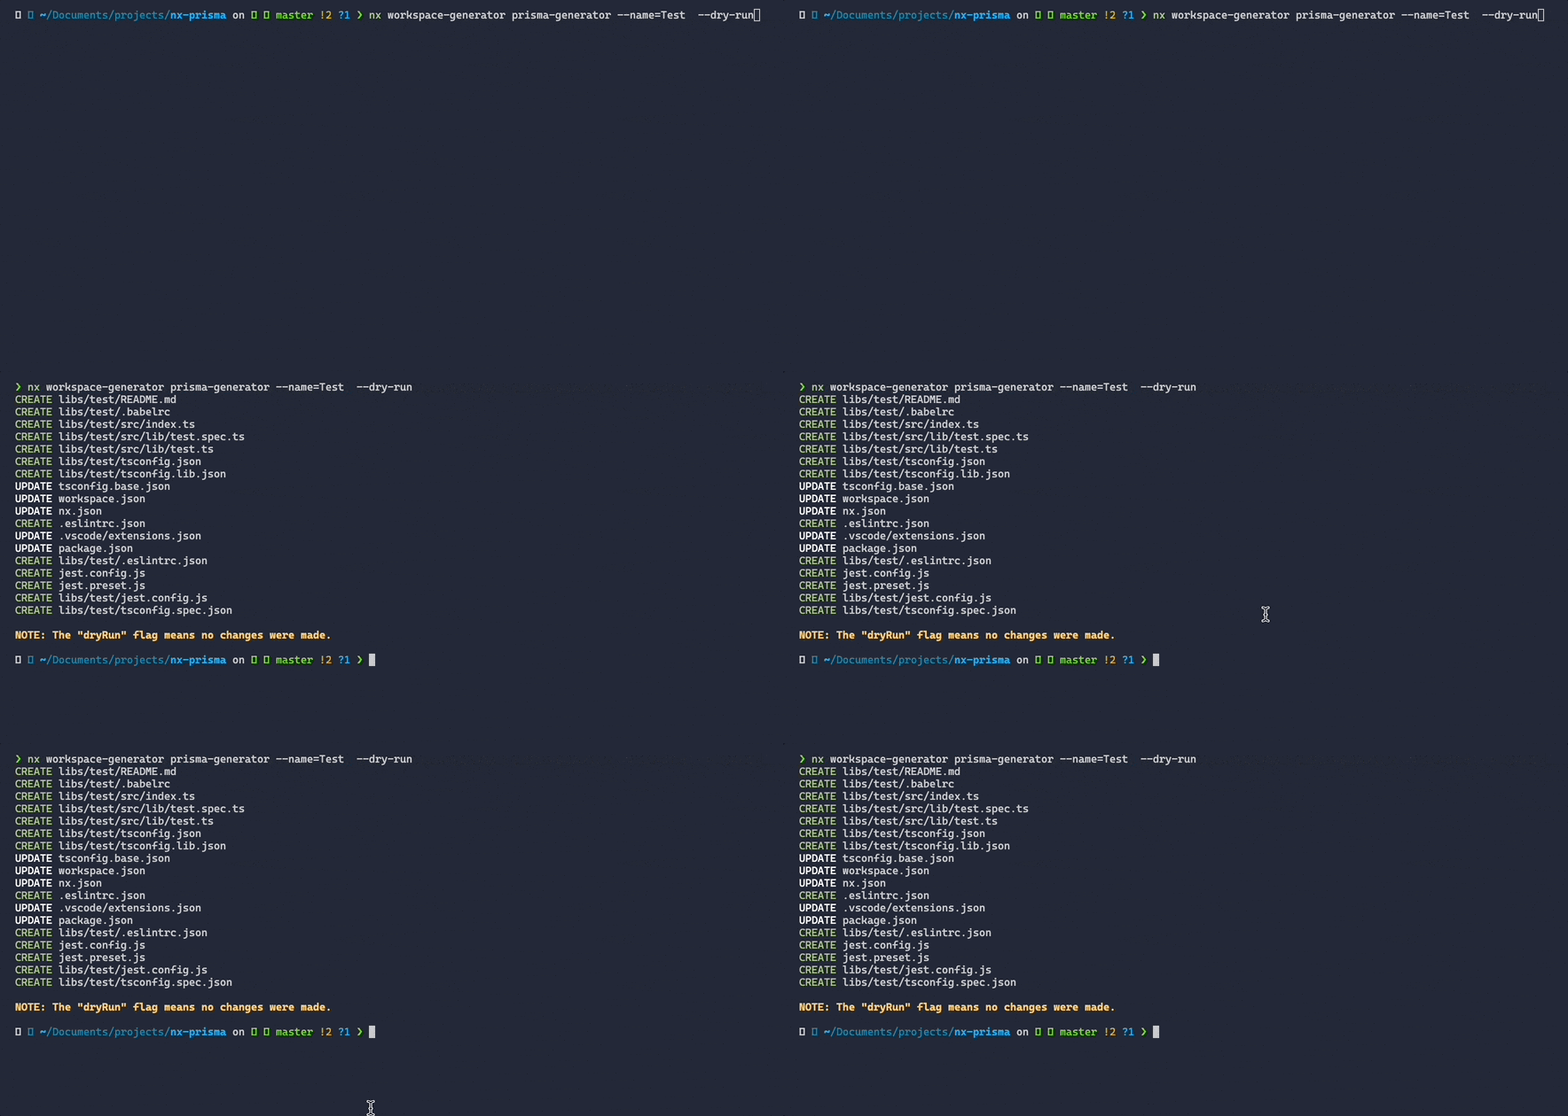
If you run this generator as is, it will generate a library in the libs folder. If you'd like to see what would be generated by this generator (or any generator) without actually creating files, you can pass the --dry-run flag.
nx workspace-generator prisma-generator --name=Test --dry-run
Using the Extension
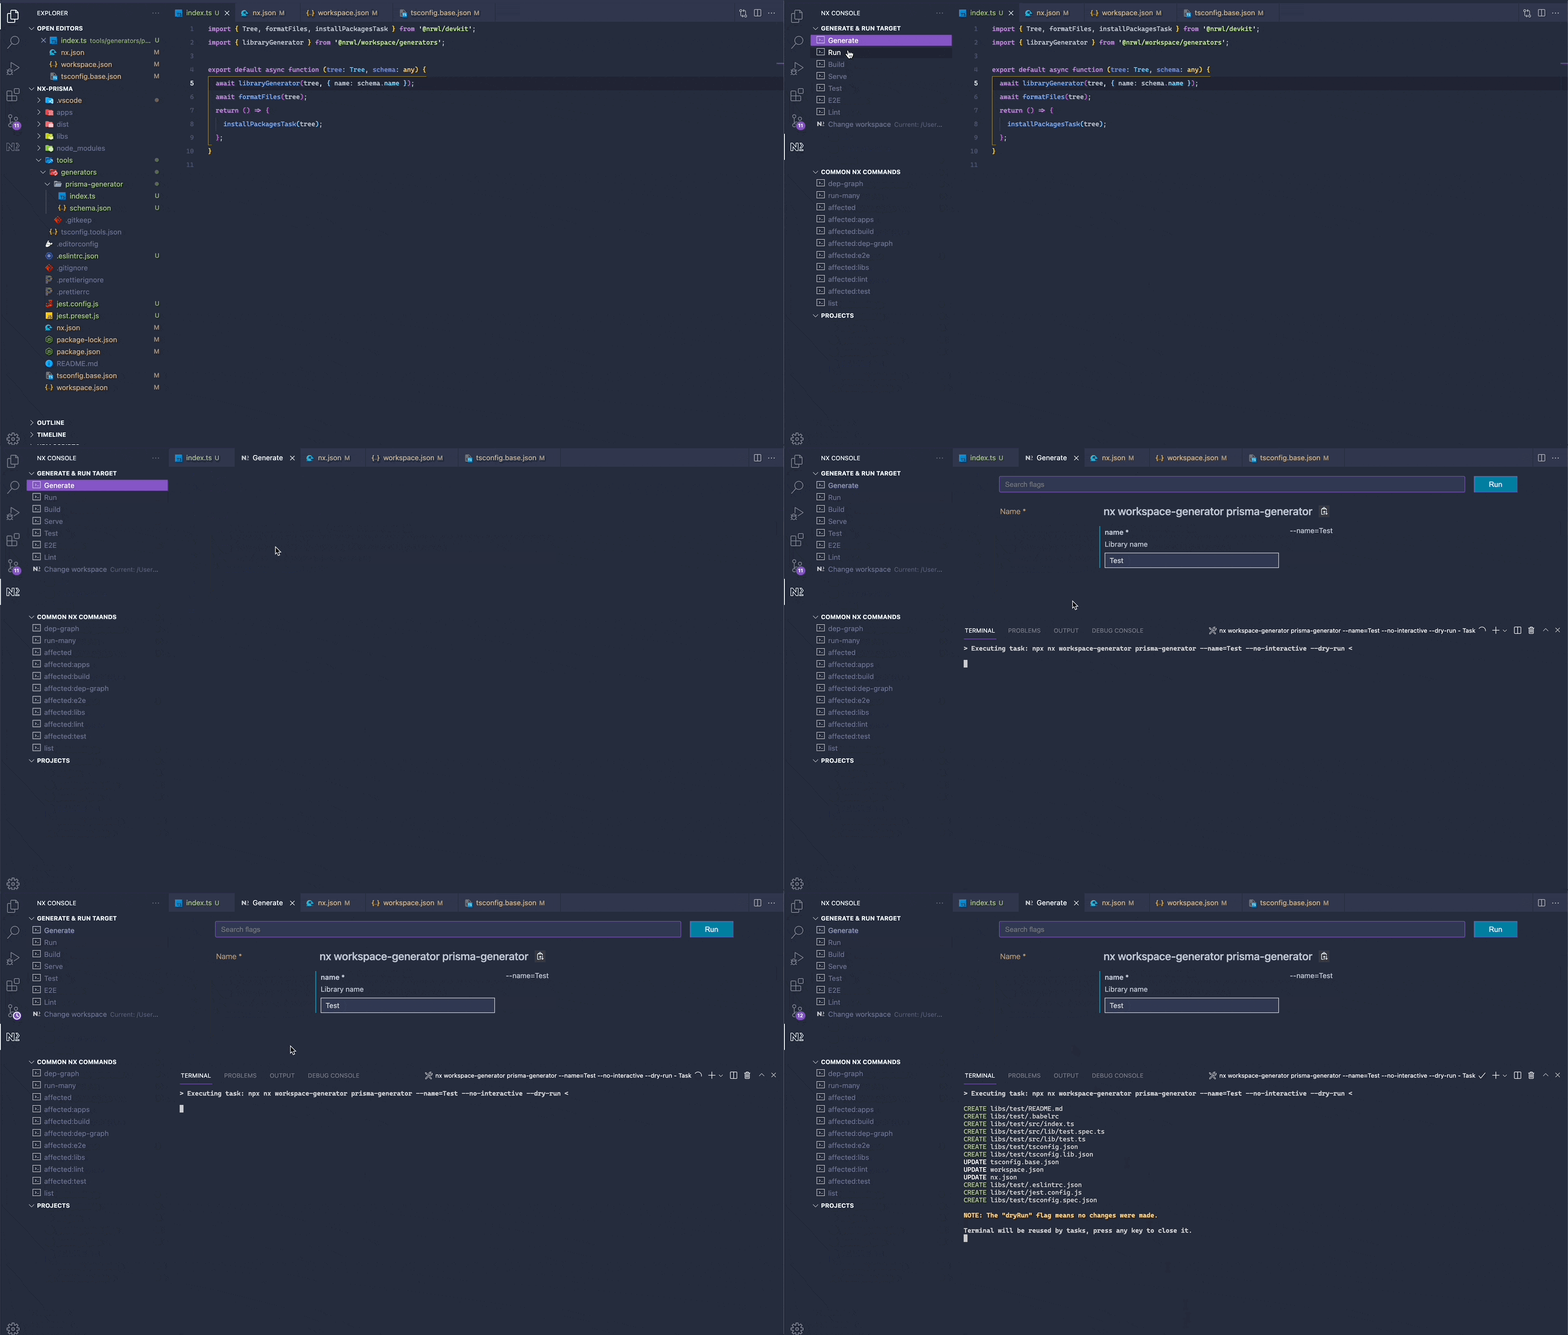
If you have the Nx extension, you can use it to run your generate command without having to use the terminal!
So we've got a generator that is creating files. That's a good first step, but now let's instruct it on how to build our Prisma setup.
Building the Generator
Set up Starting Point
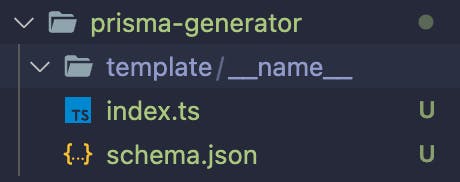
By default, our generator was created with two files:
index.ts: This is the file where we build out our generator functionality and will use Nrwl's devkit to build the Prisma clientschema.json: This is where we configure the options and descriptions of our generator. We'll be setting up inputs in this file so we can configure our client
If you pop open the index.ts file at tools/generators/prisma-generator/index.ts file you should see the code for the default generator.
import { Tree, formatFiles, installPackagesTask } from '@nrwl/devkit';
import { libraryGenerator } from '@nrwl/workspace/generators';

export default async function (tree: Tree, schema: any) {
  await libraryGenerator(tree, { name: schema.name });
  await formatFiles(tree);
  return () => {
    installPackagesTask(tree);
  };
}
Let's go ahead and start fresh, then build from the ground up. We'll get rid of all of the functionality inside the exported function and instead console.log the schema argument. This is going to hold the input options we give it via the terminal.
import { Tree } from '@nrwl/devkit';

export default async function (tree: Tree, schema: any) {
  console.log(schema)
}
If you run the generator now, passing it the name test, you should see the following output:
// nx workspace-generator prisma-generator --name=test --dry-run
{ "name": "test" }
Setting up Generator Options
In order to generate a customized Prisma project, we'll need to have a few pieces of input when we run the generator:
name: The name of the prisma project, which we will use to set up the proper names for the files, imports, and exports we will be generatingprovider: The name of the provider so we can correctly set up the schema's datasource block. (See a full list of providers here)connectionString: Connection string that will be added to a generated variable in a.envfile that all prisma schemas will share.
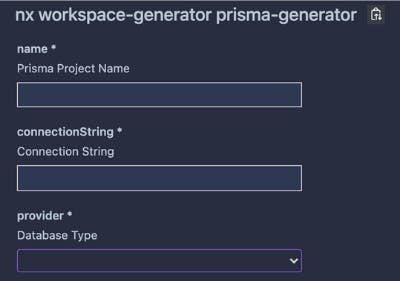
As mentioned previously, we can set up inputs to our generator in schema.json. Inside that file there is a properties object where we configure them. Currently it should have one default input.
"properties": {
  "name": {
    "type": "string",
    "description": "Library name",
    "$default": {
      "$source": "argv",
      "index": 0
    }
  }
}
This allows us to use the name flag with the generator
nx workspace-generator prisma-generator --name=Test
Fortunately, we need an argument named name so let's just modify this one. All we really need to do is change its description (Which will display nicely in the Nx extension view). Also we'll remove the $default value configuration because we won't need this and add an x-prompt so we'll get a nice prompt when running it via the terminal.
"name": {
  "type": "string",
  "description": "Prisma Project Name",
  "x-prompt": "What do you want to call the project?"
},


The next piece of data we need is the provider. To give this a nice UI, we'll go ahead and make this a radio option with a list of values to choose from.
To do that, create another input using anx-prompt of the type list.
"provider": {
  "type": "string",
  "description": "Database Type",
  "x-prompt": {
    "message": "Which type of database are you connecting to?",
    "type": "list",
    "items": [
      { "value": "sqlserver", "label": "MSSQL" },
      { "value": "postgresql", "label": "Postgres" },
      { "value": "mysql", "label": "MySQL" },
      { "value": "sqlite", "label": "SQLite" },
      { "value": "mongodb", "label": "MongoDB" }
    ]
  }
}
And we'll also add provider to the list of required fields, using the required array at the bottom. It should now read:
"required": ["name", "provider"]
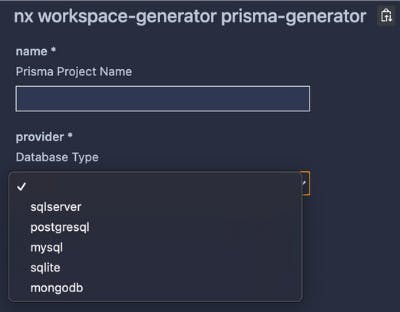

That looks pretty sweet! The last piece of data we'll need is the connectionString. This one will be almost exactly like the name field, a simple text input. We'll also add it to the array of required fields.
"connectionString": {
  "type": "string",
  "description": "Connection String",
  "x-prompt": "What is the connection string you want to use?"
},
...

"required": ["name", "provider", "connectionString"]

Building the Template
Okay so we've got a good starting point and our inputs set up. The next thing we'll tackle is putting together the template that our generator will hydrate with our input and copy over to our file system.
We are going to create some files and folders that have strange names like
__name__. These will be eventually replaced by Nrwl's devkit with a meaningful value
In your generator's folder, create a new folder called template and another folder within that one called __name__. This is where we will hold our template files.
Within that __name__ folder, let's initialize Prisma to give us a starting point for our template.
ejsallows us to use variables in file and folder names using this syntax:__variable_name__
prisma init
Go ahead remove the .env file that was generated here. We'll be using a shared .env file that is auto-generated so we can configure the environment variables all in one place.
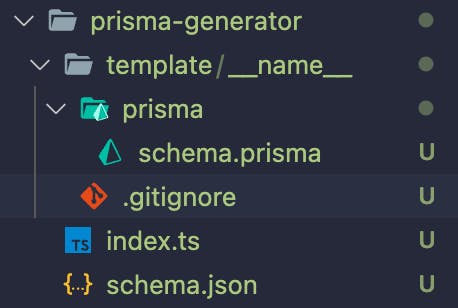
The next thing we'll want to do is pop open that schema.prisma file and add some variables into the template that will get hydrated when the generator runs.
generator client {
  provider = "prisma-client-js"
  output   = "<%= outputLocation %>"
}

datasource db {
  provider = "<%= dbType %>"
  url      = env("<%= constantName %>_SOURCE_URL")
}
Here we’re setting up variables to get replaced with data from the generator function using ejs syntax, which is used by the devkit under the hood.
An
ejsvariable is set up using this syntax:<%= variable_name %>
You may notice the editor complaining about syntax errors in your schema.prisma file. That's because, as you may expect, prisma doesn't know about ejs and thinks it’s just invalid syntax.
You can either ignore that for now, or if it’s bothering you rename the file to schema.prisma__tmpl__ as we will be setting up something later on to strip out __tmpl__ from file names.
Okay, our schema.prisma file is ready to be hydrated by a generator. The next thing we'll want to add is an index.ts file that will export our generated Prisma Client so we can access it as a library. Add that file into the template/__name__ folder.
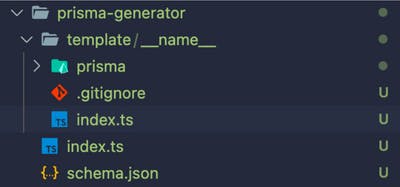
This file's job will be just to act as an entry point to the generated client. It will export all of the generated types and assets Prisma generated, and the Prisma Client itself with a custom name to match the project name.
export { PrismaClient as  <%= className %>Client } from '.prisma/<%= name %>-client';
export * from '.prisma/<%= name %>-client'
Note we used
classNameinstead ofnamefor the renamed export. We'll create a version of thenamekey that isPascalCaseto match common formatting.
Lastly, we will want to rename this file to index.ts__tmpl__ so that the compiler does not recognize it as a TypeScript file, otherwise the compiler will pick the file up and try to compile it. This would cause a failure because of the ejs.
Building out the Generator
We're getting pretty close! We've got our input values so we can specify how to name and output the client. We've got a template project that we'll hydrate with these variables.
The final piece we need is the function to actually generate the project. If you remember, all that function currently does is console.log the terminal input.
The first thing we'll do is set up an interface to describe the input we should expect from the terminal.
import { Tree } from '@nrwl/devkit';

interface GeneratorOptions {
  name: string;
  provider: string;
  connectionString: string;
}

export default async function (tree: Tree, schema: GeneratorOptions) {
  console.log(schema)
}
You may be wondering what that tree variable is. This is a variable that gets passed to a generator that represents the file system. We can perform certain operations like reading files and writing files with that function.
The @nrwl/devkit also provides more functions we'll be using in this generator. The first one is names.
import { Tree, names } from '@nrwl/devkit';

interface GeneratorOptions {
  name: string;
  provider: string;
  connectionString: string;
}

export default async function (tree: Tree, schema: GeneratorOptions) {
  const nameFormats = names(schema.name)
}
What this does is returns an object with different casings of the string provided. For example, if we passed in test_name to the function, we would get this object back:
{
  name: "test_name",
  className: "TestName",
  propertyName: "testName",
  constantName: "TEST_NAME",
  fileName: "test-name"
}
We'll use a couple of these different formats later on.
The next thing we'll do is actually generate the files from our template. To do that we'll use the devkit's generateFiles function. This function takes in four parameters:
| Parameter | Description |
| tree | This will be the tree variable that represents the filesystem |
| srcFolder | Path to the template folder |
| target | Output Path |
| substitutions | An object that sets up the variables we will use to hydrate the template where we set up ejs variables |
import {
  Tree,
  names,
  generateFiles,
  joinPathFragments
} from '@nrwl/devkit';

interface GeneratorOptions {
  name: string;
  provider: string;
  connectionString: string;
}

export default async function (tree: Tree, schema: GeneratorOptions) {
  const nameFormats = names(schema.name)

  generateFiles(
    tree,
    joinPathFragments(__dirname, './template'),
    'libs/prisma-clients',
    {}
  )
}
We've imported here the generateFiles function and a helper function named joinPathFragments so that we can use __dirname to get to the current directory.
If we were to run this generator now, our template would get copied over into the libs/prisma-clients folder (it will get created if it does not exist). The only problem is we haven't replaced the ejs variables with meaningful values yet! We can fill in the substitutions argument with our data to get that to work.
If you look back at the template we created, you'll find we are expecting these variables in our template:
dbType: Our providertmpl: A variable we want to replace with''to strip__tmpl__out of the file namesname: The name of the prisma project we are generatingclassName: The class-name format of the project nameconstantName: All-caps version of our project nameoutputLocation: The output location of the generated client
const { name, className, constantName } = names(schema.name)

generateFiles(
  tree,
  joinPathFragments(__dirname, './template'),
  'libs/prisma-clients',
  {
    dbType: schema.provider,
    tmpl: '',
    name,
    className,
    constantName,
    outputLocation: `../../../../node_modules/.prisma/${name}-client`
  }
)
Above we pulled the name and className out of the object the names function returns. Then in the substitutions object in generateFiles we added all of the variables the template is expecting.
Note the output location: Prisma has the ability to be generated anywhere, however there is a known issue with Prisma and Nx not playing nicely together when the Prisma client is inside of the
Nxproject and the project is built. We are specifying that we want it to go to the default.prismafolder, but in a separate client folder with our project's name.
Now our template should get hydrated and copy over to the correct location in our Nx project!
The next piece we need here is the ability to create and/or update a .env file to hold our connection strings. To do this we'll make use of the file tree's exists, read and write functions.
After the generateFiles function, add the following code:
import {
  formatFiles,
  generateFiles,
  joinPathFragments,
  names,
  Tree
} from '@nrwl/devkit';

// ...

// Write .env
if ( !tree.exists('.env') ) {
  tree.write('.env', '')
}

let contents = tree.read('.env').toString()
contents += `${constantName}_SOURCE_URL=${schema.connectionString}\n`
tree.write('.env', contents)

await formatFiles(tree)
What this does is first checks to see if a .env file exists in the root project folder. If not, it creates one with no content.
Then it grabs the contents of that file (in case it had existed before and already had some content). We then append a new variable in the file that holds our connection string and write the contents back to that file.
Finally, we'll do something very similar and generate a bucket index.ts file that exports each client in one location.
// Write export
if ( !tree.exists('libs/prisma-clients/index.ts') ) {
  tree.write('libs/prisma-clients/index.ts', '')
}

let exportsConents = tree.read('libs/prisma-clients/index.ts').toString()
exportsConents += `export { ${className}Client } from './${name}';\n`
tree.write('libs/prisma-clients/index.ts', exportsConents)

await formatFiles(tree)
As a little bonus, I also imported and ran the formatFiles function from the devkit to format the files we added and modified in this generator function.
The complete function
import {
  formatFiles,
  generateFiles,
  joinPathFragments,
  names,
  Tree
} from '@nrwl/devkit';

interface GeneratorOptions {
  name: string;
  provider: string;
  connectionString: string;
}

export default async function (tree: Tree, schema: GeneratorOptions) {
  const { name, className, constantName } = names(schema.name)

  generateFiles(
    tree,
    joinPathFragments(__dirname, './template'),
    'libs/prisma-clients',
    {
      dbType: schema.provider,
      tmpl: '',
      name,
      className,
      constantName,
      outputLocation: `../../../../node_modules/.prisma/${name}-client`
    }
  )

  // Write .env
  if ( !tree.exists('.env') ) {
    tree.write('.env', '')
  }

  let envContents = tree.read('.env').toString()
  envContents += `${constantName}_SOURCE_URL=${schema.connectionString}\n`
  tree.write('.env', envContents)

  // Write export
  if ( !tree.exists('libs/prisma-clients/index.ts') ) {
    tree.write('libs/prisma-clients/index.ts', '')
  }

  let exportsConents = tree.read('libs/prisma-clients/index.ts').toString()
  exportsConents += `export { ${className}Client } from './${name}';\n`
  tree.write('libs/prisma-clients/index.ts', exportsConents)

  await formatFiles(tree)
}
With this our generator function is complete! Let's give it a test by generating a prisma client that connects to a SQLite database...
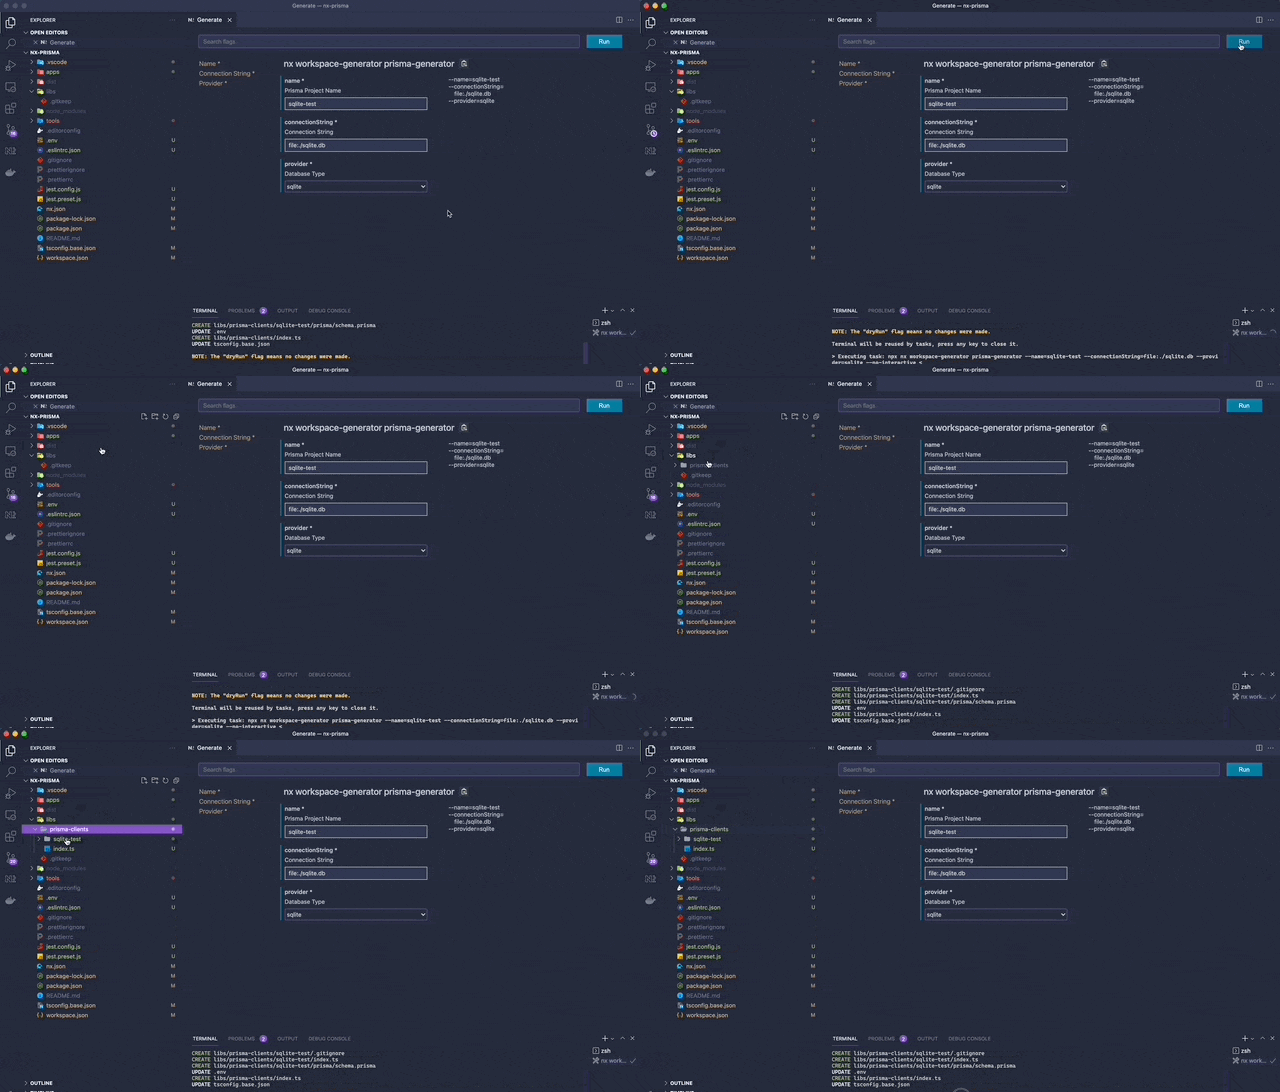
If you look through those files you'll find that all of our ejs variables were filled in with the values we provided.
Database Push and Client Generation
The only thing we need now is to build a schema, apply the schema to our database, and generate the prisma client.
Open up the generated schema.prisma file and add a model:
generator client {
  provider = "prisma-client-js"
  output   = "../../../../node_modules/.prisma/test-client"
}

datasource db {
  provider = "sqlite"
  url      = env("TEST_SOURCE_URL")
}

model User {
  id Int @id
}
Now from your project's root run the following commands:
prisma db push --schema="./libs/prisma-clients/sqlite-test/prisma/schema.prisma"
prisma generate --schema="./libs/prisma-clients/sqlite-test/prisma/schema.prisma"
These will push our database schema to the sqlite database file we set up via our connection string. It will then generate the client into the output folder we specified.
Then in tsconfig.base.json we’ll create a pathing configuration that allows easy access to our prisma clients by adding two records to the paths object:
"paths": {
  "@nx-prisma/prisma-clients": [
    "libs/prisma-clients/index.ts"
  ],
  "@nx-prisma/prisma-clients/*": [
    "libs/prisma-clients/*"
  ]
}
Testing It Out
To test out our client, we'll create a quick NestJS application using Nx's nest generator.
npm install -D @nrwl/nest
nx generate @nrwl/nest:application nest-app
That should start off a project for us in the apps folder.
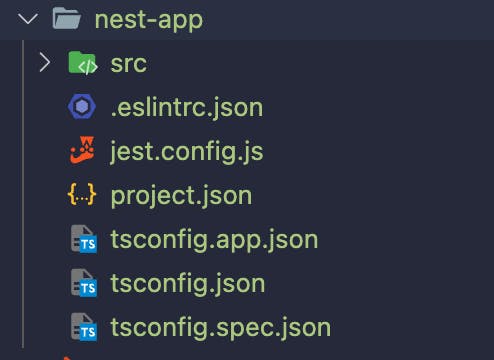
In apps/nest-app/src/app/app.service.ts, import the client and add a function to create and read some data:
import { Injectable } from '@nestjs/common';
import { SqliteTestClient } from '@nx-prisma/prisma-clients'
import { User } from '@nx-prisma/prisma-clients/sqlite-test'

@Injectable()
export class AppService {
  private prisma: SqliteTestClient;
  constructor() {
    this.prisma = new SqliteTestClient()
  }

  async getData(): Promise<User[]> {
    this.prisma.$connect()
    await this.prisma.user.create({ data: { id: Math.floor(Math.random() * 1000) + 1}})
    const users = await this.prisma.user.findMany()
    this.prisma.$disconnect()
    return users
  }
}
NOTE: This is not production-ready code, only a quick sample to show data being read and returned. Check out Prisma's docs detailing how to handle prisma connections in Nest.
If you run nx serve nest-app, it should start up the server at http://localhost:3333 and have an /api endpoint.

Go ahead and navigate to http://localhost:3333/api and refresh the page a few times. You should see that it creates a new record each time and returns the data.

You can set up any amount of prisma instances with the generator and use them this way!
Wrapping Up
This article took a look at how to automate the process of managing prisma instance setups. It's pretty awesome how powerful Nx and Prisma can be together!
What we created today is just the tip of the iceberg. I challenge you to look deeper into Nx's custom executors as well, where you can create automated processes to push and build your prisma instances too! The solution we came to in this article was one of many ways to solve our problem. I also encourage you to take some time to think about how you would change or improve what we did today 🚀
Thanks so much for taking the time to read this article and learn a bit about working with an Nx mono-repo and Prisma 😁
Happy coding!


