

Building a Prisma Schema
Learn how to build a Prisma Schema and connect to Postgres locally on Docker

Welcome back to the series Playing with Prisma!
In this article we're going to take a look at how to build out a Prisma schema. To do this, rather than just regurgitating the docs (which are fantastic by the way, kudos Prisma), we're going to come up with a little project and build out a schema to fit our needs!
While we will cover a lot of the cool options available to us when setting up a schema, I do recommend reading the docs to see everything Prisma has to offer.
The Project
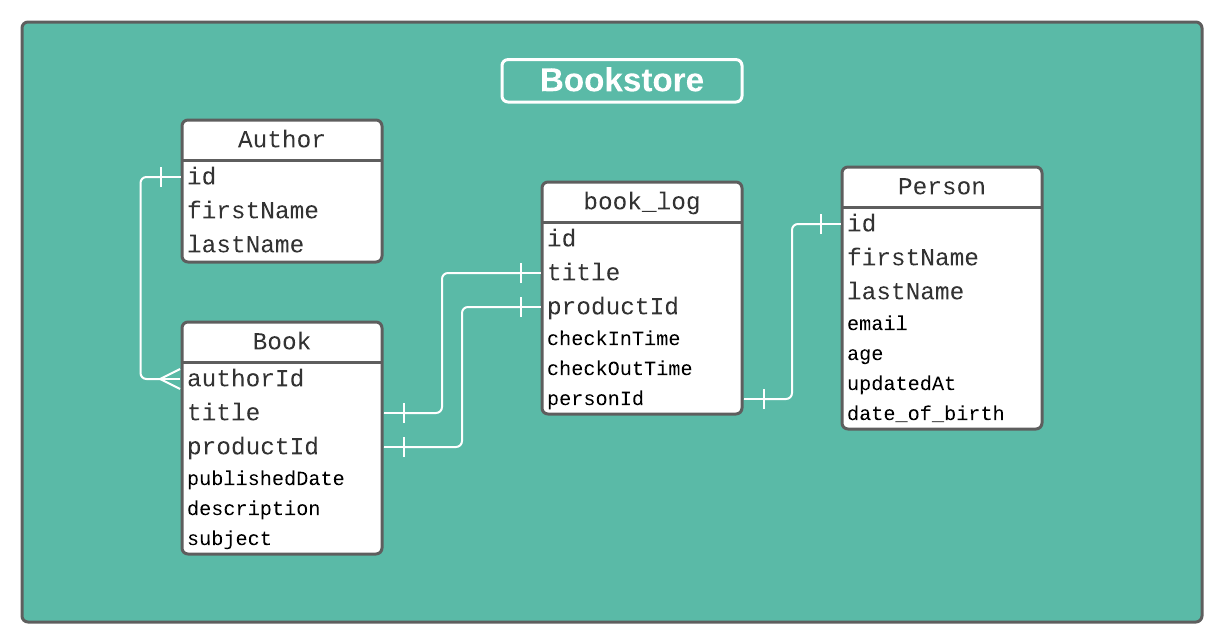
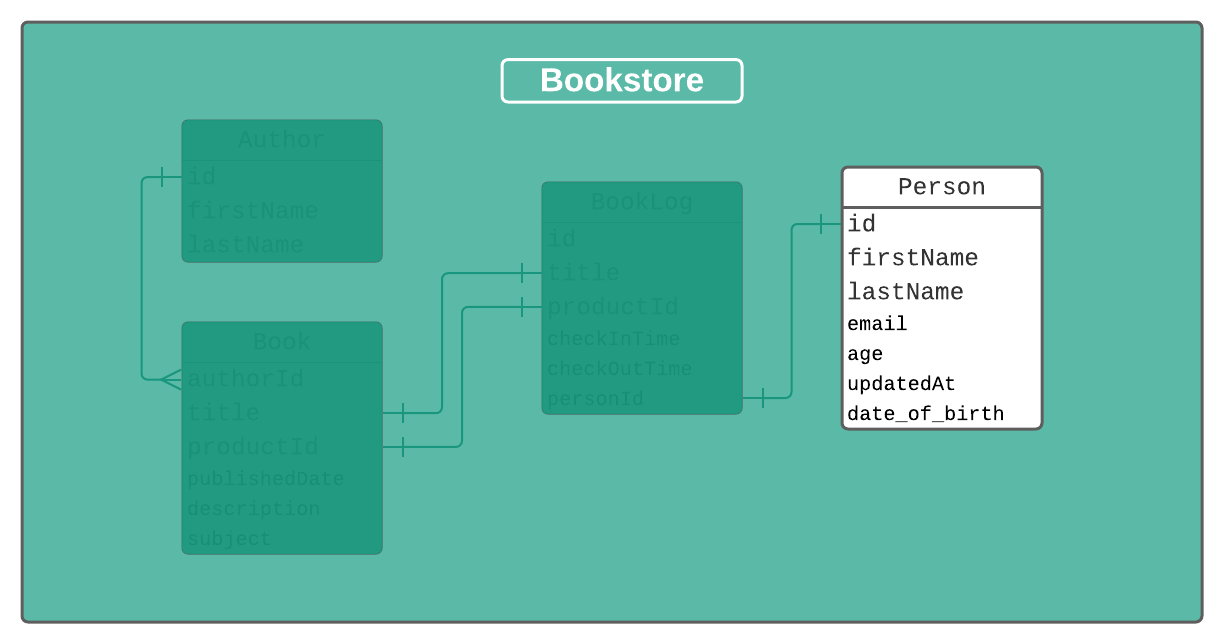
The schema we'll be scaffolding out will be for a bookstore's website with a checkout system.
We'll want to keep track of books, authors, subjects, etc... for the searching functionality of the website. Also, we'll need a way to keep track of people and check-in/out times.
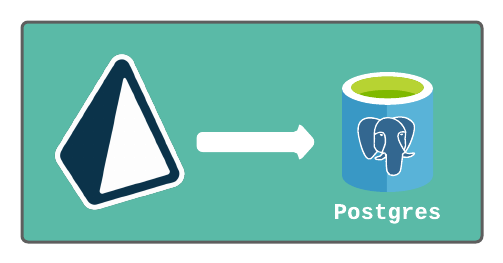
Let's assume our database is a Postgres database and we are starting fresh.
All the things we cover will apply to the other available database providers as well, unless stated otherwise.
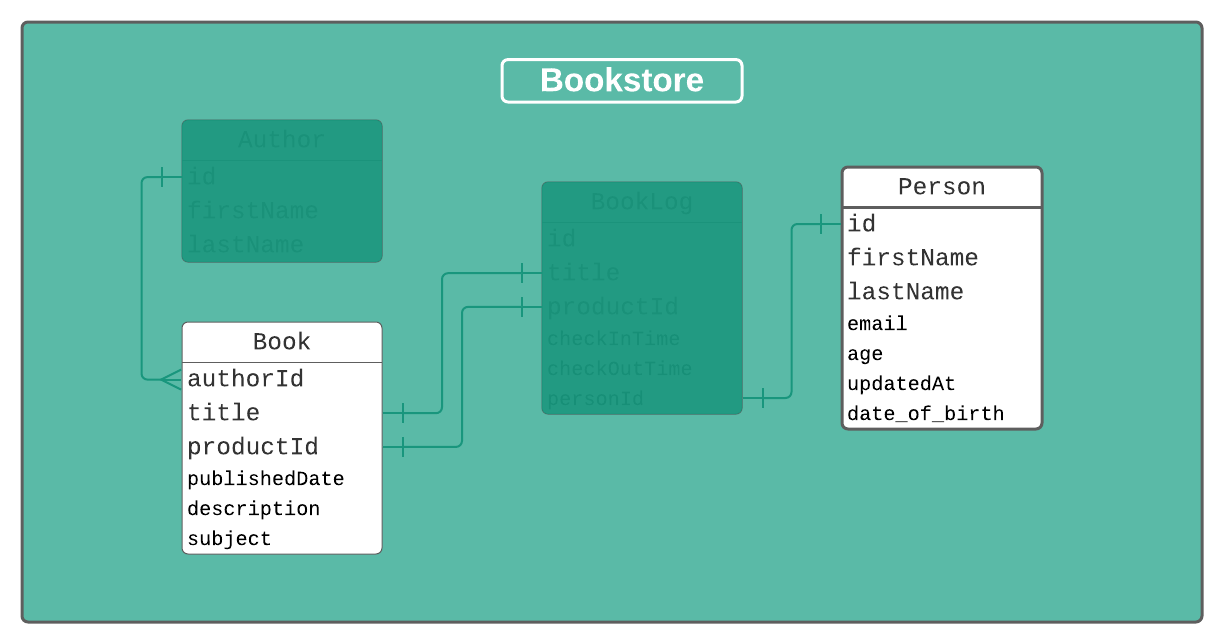
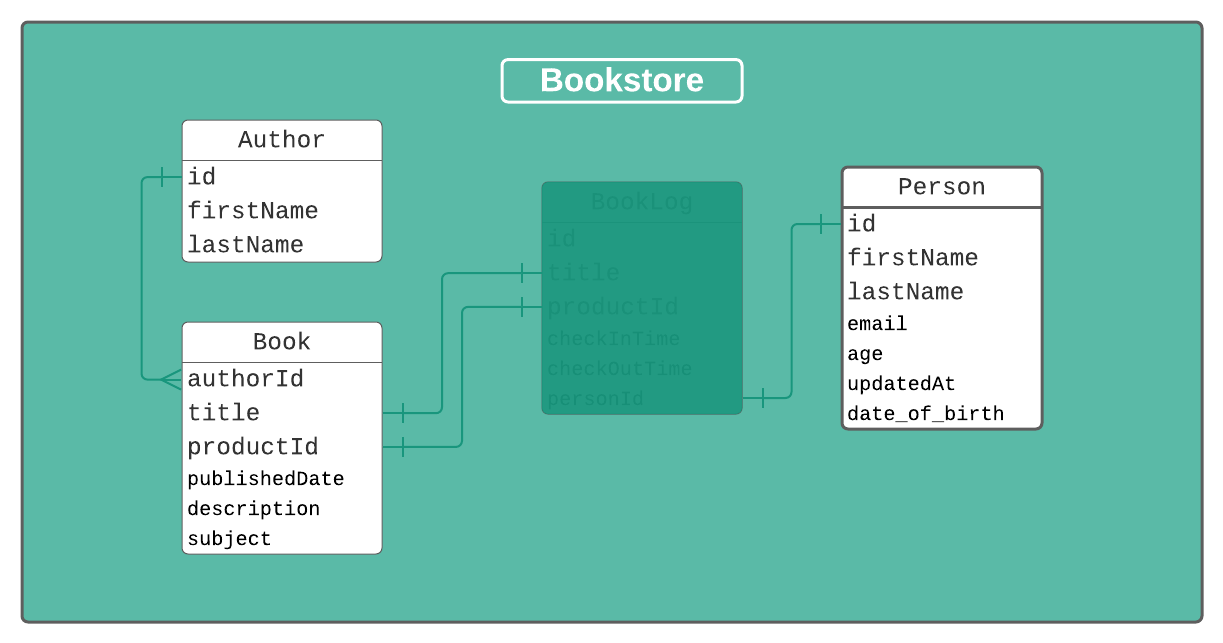
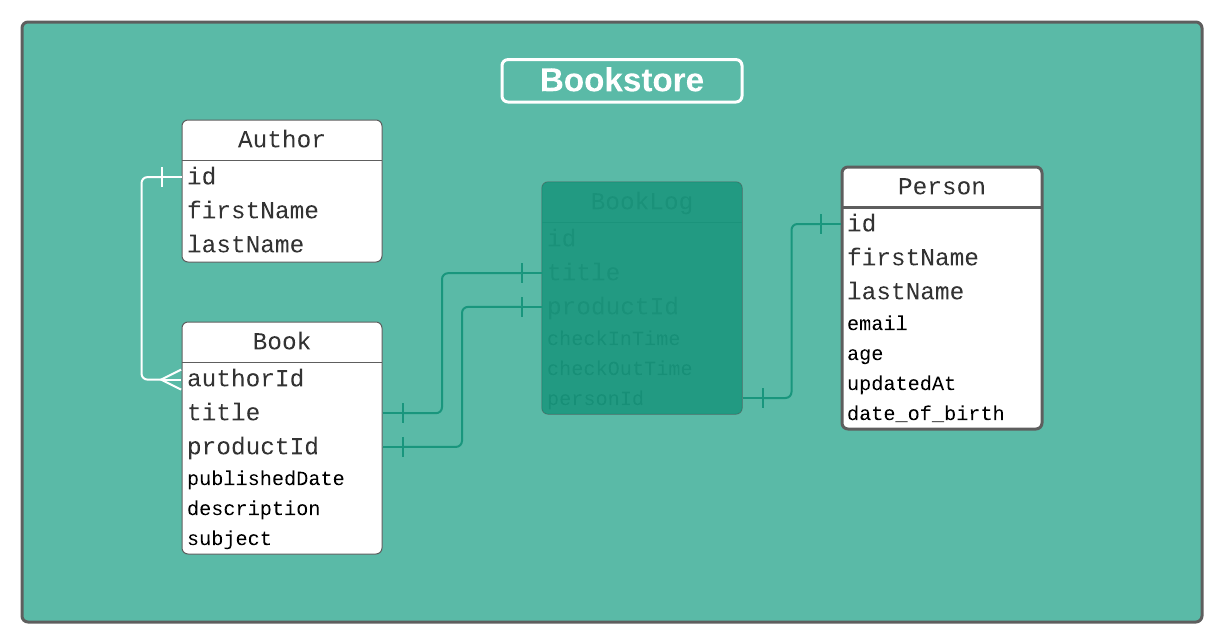
To get an idea of what we're doing, here is a general picture of what our database should look like in the end:
Let's get to it!
Setting up Prisma
To start off, let's go ahead and create a super simple project to hold our Prisma client we will end up generating.
Wherever you'd like, go ahead and create a project folder. Initialize npm inside of this project and install the prisma package so we can put it to use!
mkdir bookstore-project
cd bookstore-project
npm init
npm i --save prisma
Now let's initialize prisma, which will scaffold out the initial files we'll need to get going. We'll also take a shortcut and let prisma know we'll be connecting to a postgres database.
prisma init --datasource-provider=postgresql
Once that does its thing, you should be left with a basic project that looks like this:
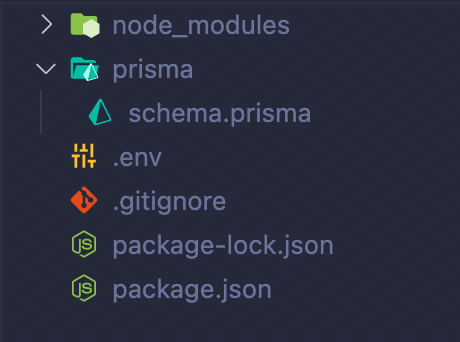
We're ready to start configuring and putting our schema together! Go ahead and pop open that schema.prisma file and we'll get started!
(Optional) Local Postgres Setup With Docker
Setup Instructions
In order to actually generate and build our client, prisma needs to know of a server to connect to. Below is how we can set one up locally in Docker. We won't go into too much detail here, just how to get it going.
Installing Docker
You can download and install docker here
Add docker-compose file
In your project's root, create a file called docker-compose.yml. Paste the following into the file:
version: '3.1'

services:

  db:
    image: postgres
    restart: always
    environment:
      POSTGRES_PASSWORD: example
    ports:
      - 5432:5432

  adminer:
    image: adminer
    restart: always
    ports:
      - 8080:8080
Update .env file
DATABASE_URL="postgresql://postgres:example@localhost:5432/bookstore"
Spin up the database and admin panel
Now that those are configured, run the following command to bring up the postgres server and an admin panel (adminer):
docker-compose up -d
Note: We added the -d flag at the end to run this in detached mode, freeing up our terminal for more commands
Test It Out
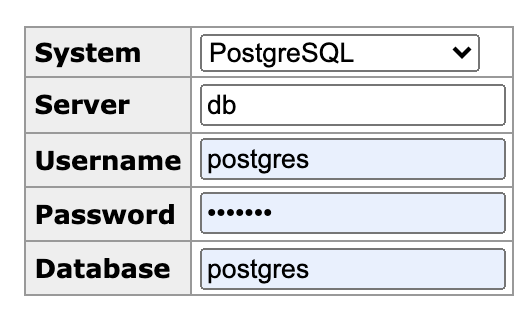
Once that finishes pulling the docker images and setting up the servers, head over to localhost:8080 to make sure the admin panel comes up.
You can log in with the credentials:
- username:
postgres - password:
example - database:
postgres
Prisma Schema
The prisma schema is the main configuration file for prisma. It's where prisma learns how to connect to our database, how to generate the prisma client (or any other assets via custom generators), and how to map our data from the database to our application.
A Prisma Schema is built up of three major pieces (or blocks):
- Datasources
- Generators
- Models
Each piece plays a crucial role in the configuration and generation of our Prisma Client (or other generated assets depending on the generator we configure).
A block is composed of a block type, a name, and the fields and options for that block.
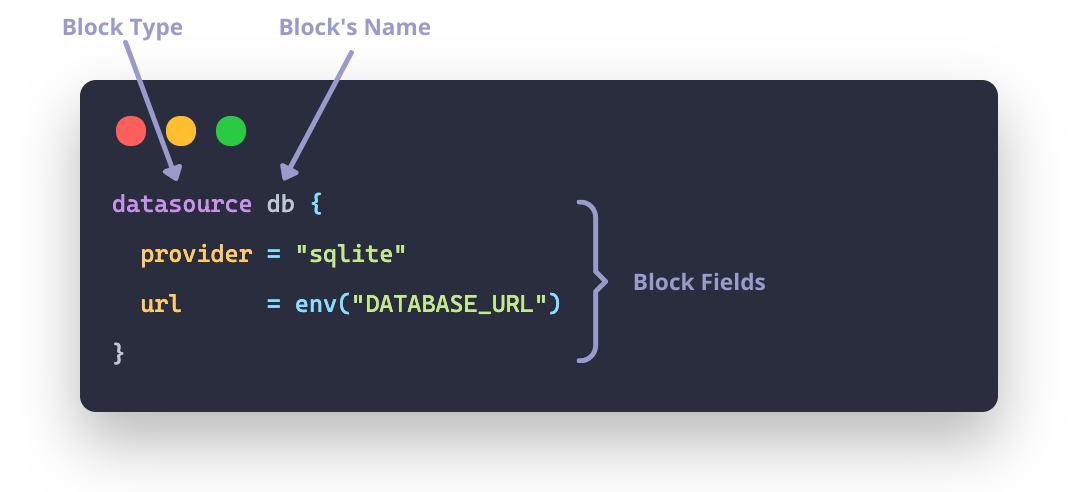
Datasource
The first thing we'll want to configure is our datasource block.
This is where we tell Prisma how to connect to our database and what kind of database we are connecting to. Its configuration is fairly straightforward and doesn't have a whole lot going on in it so we won't have to go too deep to understand what it's doing.
Each Prisma schema must have exactly one datasource block configured. No more and no less, as multiple datasources are not supported.
To define a datasource block, we can create a schema block with the type datasource, some name (typically db by convention), and its options.
datasource db {
  provider = "postgresql"
  url      = env("DATABASE_URL")
}
Available Providers
datasource db {
  provider = "sqlite"
}
| Database | Provider String |
| Postgres | postgresql |
| MySQL | mysql |
| SQLite | sqlite |
| MSSQL | sqlserver |
| MongoDB | mongodb |
As you may have guessed, here we are telling Prisma we want to use a postgres database. We are also telling it to look in process.env for a variable called DATABASE_URL to get the connection string.
The
env()function allows us to access environment variables viadotenv-expand. It can only be used in two places: the datasourceurlfield, and the generatorbinaryTargetsfield.
We could have also passed a string to the url option instead of using the env() function.
There are other options available to the datasource block described here. But for now we'll keep it to what we need.
Generator
The next piece we'll add is a generator block.
A generator allows you to configure what is generated when you run the command prisma generate. You can configure multiple generators per schema, however by default Prisma sets up a single generator and specifies prisma-client-js as the provider, which builds the Prisma Client.
generator client {
  provider = "prisma-client-js"
}
Note the generator is named
clienthere, but that name could be anything
There are a few different options available to configure things like where to output the generated assets, but for now we'll stick to the default settings.
Feel free to check out the rest of the config options here.
Our file in total should now look like this:
datasource db {
  provider = "postgresql"
  url      = env("DATABASE_URL")
}

generator client {
  provider = "prisma-client-js"
}
This is all the config we need to define our data connection and configure our generated assets. Now we will move on to the good stuff, modeling out our data!
Models
The model blocks are where we actually tell Prisma what our data looks like and how it should be handled in the Prisma Client.
On a model you can define fields, table/field name mappings, attributes describing the data, and relations to relate models to each other.
A field is made up of a field name, a data type, and any attributes to describe that field of data.
There are tons of different options for our models and fields, and we'll have to make use of a lot of those to get our bookstore schema going.
Refer to the docs for a full list of types and attributes
Person model
 Let's start off by building out the base of our
 Person model, which will hold the people who can check in and out books.
@id, @default
model Person {
  id        Int       @id @default(autoincrement())
}
Here we are using two "attributes" that Prisma Syntax Language provides to describe our id field. First we are letting prisma know that field is an @id, which signifies this field is the unique identifier for data in this table. Each model needs to have a unique identifier.
We are also using the @default attribute to specify that the default value for that field should be a number that increments for each row with the autoincrement() function.
We're going to need more than that to describe our Person though. Let's add some more fields:
@unique, @updatedAt
model Person {
  id        Int       @id @default(autoincrement())
  firstName String
  lastName  String
  email     String    @unique
  age       Int
  updatedAt DateTime  @updatedAt
}
That's a bit more like it! Now we've got a pretty good model describing our Person.
We've made use of the @unique attribute here to let prisma know the email field should be unique in that table. No persons should have the same email!
We also created a column with the @updatedAt attribute, which will cause that column to automatically update with a current timestamp whenever the row of data updates. Fields using this attribute MUST be of type DateTime.
For now that's all we'll need for our Person model. Let's move on to the Book model.
Book model
Just to get things started, lets set up some of the basic fields we know we'll need for our Books:
model Book {
  title         String
  productId     String
  publishedDate DateTime
  description   String
}
These fields are all super simple, but we don't have a unique identifier yet!
Lets create a compound identifier with the book's title and productId fields that will be used as the Primary Key for this table.
Also let's limit the description field to 150 chars by reaching in to Postgres's native types.
@db native types, @@id
model Book {
  title         String
  productId     String
  publishedDate DateTime
  description   String    @db.VarChar(150)

  @@id([title, productId], name: "titleProduct")
}
Prisma allows us to use the @db attribute to specify some of the native types available to whichever database provider we are using.
The compound ID we created specifies that this table's rows should have unique combinations of title and productId. We've also passed it an optional name parameter to name the compound ID. Otherwise it would be generated as just title_productId.
The last thing I'd like to add to our book is a Subject. To do this we'll set up an enum, which is a feature available only to Postgres, MySQL, and MongoDB.
enum
An enum describes a set of possible values. For a full description of how to use enums, check out prisma's docs
enum Subject {
  GENERAL
  HORROR
  MYSTERY
  ROMANCE
  EDUCATIONAL
}
Here we set up an enum of Subjects. To use this, we can just create a field on our model and give it the type of our enum.
model Book {
  title         String
  productId     String
  publishedDate DateTime
  description   String    @db.VarChar(150)
  subject       Subject  @default(GENERAL)

  @@id([title, productId], name: "titleProduct")
}
The subject field of our book model will now hold a value that is in the enum Subject. When creating a record in this table, if no value is provided for subject, it will default to GENERAL because we specified it in the @default attribute.
Great! Now that we have a book, we should probably set up an Author model and relate it to the Book model.
Author model
The Author model will hold our author's details and also relate to a Book so that we can join it to the Book table when querying for details.
First we'll set up the basic fields our Author will need.
Optional Fields
model Author {
  id        Int     @id @default(autoincrement())
  firstName String
  lastName  String
  birthTown String?
}
You'll notice a ? next to the String type on the birthTown field. This is a type modifier that signifies the field is optional.
We know that each Author could potentially have many books, so let's signify this in the model.
List modifier
model Author {
  id        Int     @id @default(autoincrement())
  firstName String
  lastName  String
  birthTown String?
  Books     Book[]
}
This lets us know that our Author will have a potential list of Books that are related to it. The field name can be anything, I chose Books just to make it clear. And the type, as you'll notice, is Book, which corresponds to our Book model. The [] signifies that it will be an array of books.
This is great but how does prisma know how to relate an Author to a Book? This schema will be invalid unless we set up a relation mapping in the Book model. So let's go back to our Book model and make some adjustments
@relation
model Book {
  authorId      Int
  title         String
  productId     String
  publishedDate DateTime
  description   String    @db.VarChar(150)
  subject       Subjects  @default(GENERAL)
  Author        Author    @relation(references: [id], fields: [authorId])

  @@id([title, productId], name: "titleProduct")
}
So what's going on here? I've gone ahead and added an authorId field to the model that will be used to map to our Author model.
But the more important piece is the new Author field. This field (which could be named anything, I chose Author for clarity) is of the type Author. This type corresponds to our Author model.
On that field we have defined a relation that will be shared between Book and Author.
The references option in the relation points to the field on the Author model we want to match against. The fields option points to the field on the Book model that should match the reference field. And this field is not specified as an array, so we know a Book will have one Author.
And that's it, we essentially have a one-to-many relationship between Author and Book!
This gets us the majority of the way to where we need to be to get our check-in/check-out system modeled. The last piece will be a model to hold our check-in/out log.
BookLog model
Our initial model will just hold some basic details about the book that is being checked out and the person checking it out. We'll also go ahead and create a relation between the BookLog and Person model.
@map, @@map, now()
model Person {
   <...other fields...>
   log BookLog[]
}

model BookLog {
  id           Int      @map("log_id") @id @default(autoincrement())
  title        String
  productId    String
  checkInTime  DateTime
  checkOutTime DateTime @default(now())
  personId     Int
  person       Person   @relation(fields: [personId], references: [id])

  @@map("book_log")
}
There are a couple of new things going on in this model that we haven't seen yet.
- The @map attribute is used to map our model's field name to the database's column name. In this case, the database table will have a column named
log_id, which we are using in our model asid - checkOutTime is using the
now()function in its@defaultdefinition. This will set the default value of that field to the timestamp when the record is created - The @@map attribute allows us to map our model to a database table but name the model something different. In this case, the database table will be
book_log, but our model will beBookLog.

With that, we now have the ability to query to see which user checked out which book! But what if we wanted to display some details about the book that aren't available here? Let's set up a relation to the Book model. This one will be a bit trickier though because the Book model has a compound ID instead of a single primary key!
model Book {
   <...other fields...>
   log BookLog[]
}

model BookLog {
  id           Int      @id @default(autoincrement()) @map("log_id")
  title        String
  productId    String
  checkInTime  DateTime
  checkOutTime DateTime @default(now())
  personId     Int
  person       Person   @relation(fields: [personId], references: [id])
  book         Book     @relation(fields: [title, productId], references: [title, productId])

  @@map("book_log")
}
In our relation to the Book model, we have specified that to match a book to a book log, the Book table should be joined on the title and productId fields.
As shown above, you will need to add a field on the opposite relation that defines an array of
BookLogrecords.

We're pretty much all the way there with our model! The last little thing I'd like to add is more of a convenience thing that should help speed up some queries.
Let's add an index to the BookLog table that will index queries using the id and personId fields
@index
model BookLog {
  id           Int      @id @default(autoincrement()) @map("log_id")
  title        String
  productId    String
  checkInTime  DateTime
  checkOutTime DateTime @default(now())
  personId     Int
  person       Person   @relation(fields: [personId], references: [id])
  book         Book     @relation(fields: [title, productId], references: [title, productId])

  @@index([id, personId])
  @@map("book_log")
}
Nice, now our database will index on these fields! (Probably not necessary, but hey, for science).
Wrapping Up
We should at this point have a complete schema set up and ready to handle some data! Here is what our completed file looks like:
Full Schema
generator client {
  provider = "prisma-client-js"
}

datasource db {
  provider = "postgres"
  url      = env("DATABASE_URL")
}

enum Subject {
  GENERAL
  HORROR
  MYSTERY
  ROMANCE
  EDUCATIONAL
}

model Author {
  id        Int     @id @default(autoincrement())
  firstName String
  lastName  String
  birthTown String?
  Books     Book[]
}

model Book {
  authorId      Int
  title         String
  productId     String
  publishedDate DateTime
  description   String    @db.VarChar(150)
  subject       Subject   @default(GENERAL)
  Author        Author    @relation(references: [id], fields: [authorId])
  log           BookLog[]

  @@id([title, productId], name: "titleProduct")
  @@unique([title, authorId])
}

model Person {
  id        Int       @id @default(autoincrement())
  firstName String
  lastName  String
  dob       DateTime  @map("date_of_birth") @db.Date
  email     String    @unique
  age       Int
  updatedAt DateTime  @updatedAt
  log       BookLog[]
}

model BookLog {
  id           Int      @id @default(autoincrement()) @map("log_id")
  title        String
  productId    String
  checkInTime  DateTime
  checkOutTime DateTime @default(now())
  personId     Int
  person       Person   @relation(fields: [personId], references: [id])
  book         Book     @relation(fields: [title, productId], references: [title, productId])

  @@index([id, personId])
  @@map("book_log")
}
If you set up Postgres locally via Docker, feel free to run prisma db push to build out your database tables on the actual database server. You can then view those tables via the admin view as described in the instructions above.
As you can see there are a ton of different options that Prisma Syntax Language gives us when setting up our schemas. While we covered a lot in this article, there are still tons more available. Definitely check out the docs if you're curious about those.
Thank you for sticking around until this point, and I encourage you to take this schema and play around with some queries to see how the relations work! That's where some of the real fun comes in!
Happy Coding!


